摘要:。
目录
[TOC]
NginX 反向代理服务器
Nginx 是一款轻量级的 Web 服务器、反向代理服务器、及电子邮件(IMAP/POP3)代理服务器。
- Nginx 作为整个架构的流量入口,可以理解为一个外部的网关,承担着请求的路由转发、负载均衡、动静分离、解决跨域等功能。
- 要采用多节点部署,同时通过keepalived来实现高可用,从而保障整个平台的高可用。
- 工作在七层应用层,默认80端口。
- 特点是占有内存少,并发能力强(能够经受高负载的考验,有报告表明能支持高达 50000 个并发连接数)。
正向代理、反向代理
(正向)代理:即是客户端代理,代理客户端,服务端不知道实际发起请求的客户端。隐藏了真实的请求客户端。
- 访问原来无法访问的资源,如google;
- 可以做缓存,加速访问资源;
- 对客户端访问授权,上网进行认证;
- 代理可以记录用户访问记录(上网行为管理),对外隐藏用户信息。
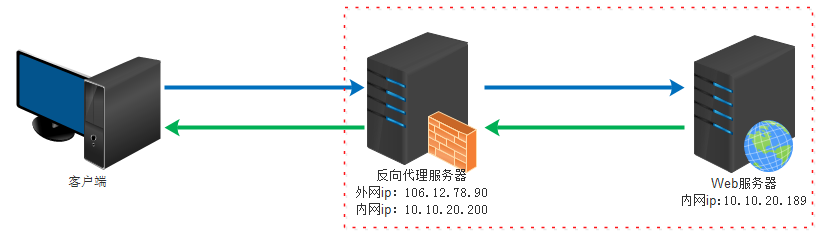
反向代理:即是服务端代理,代理服务端(真实目标服务器),客户端不知道(访问的)实际提供服务的是哪台服务器。隐藏了真实的服务端。
- 原理:实际运行方式是,客户端只需将请求发送给反向代理服务器,由反向代理服务器去选择(内部网络上的)目标服务器,将请求转发并获取数据,再返回给客户端。
- 此时反向代理服务器和目标服务器对外就像是同一个服务器,对外暴露的是反向代理服务器地址,隐藏了真实服务器 IP 地址。
- 客户端不直接请求源服务器,因此源服务器不需要外部 IP 地址,而反向代理需要配置内部和外部两套 IP 地址。
反向代理的作用:
- 作为公网访问地址,保证内网(Web服务器)的安全,阻止web攻击。
- 负载均衡:通过反向代理服务器来优化网站的负载。
- 可以用来进行缓存、日志记录等。
缺点:所有请求和响应都需要经过反向代理服务器,可能会成为性能瓶颈。
常见命令、配置文件
常用命令:
- nginx -s reload:重启
- nginx -s stop:关闭
文件介绍:
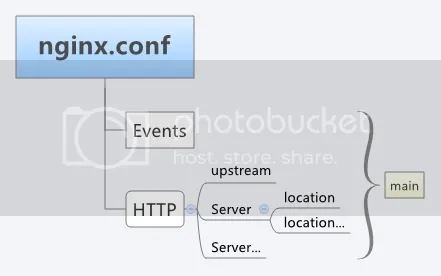
html/默认静态文件夹:里面一般会有一个index.html入口页和一个50x.html错误页,nginx默认配置会将80端口代理到入口页。conf/nginx.conf配置文件可以看做是由三个部分组成,main、events 和 http。- main(全局设置):设置的指令将影响其他所有设置;
- server(主机设置):主要用于指定主机和端口;
- upstream(负载均衡服务器设置):主要用于负载均衡,设置一系列的后端服务器;
- location(URL匹配特定位置的设置):用于匹配网页位置。
http 反向代理配置
proxy_pass:适用于配置反向代理,让Nginx将请求转发给后端服务器。最后请求的路径:proxy_pass指定的后端服务URL。root:适用于指定请求的根目录。最后请求的路径:root指定的URL + location上的URL。alias:则适用于将URL路径映射到文件系统路径,方便访问资源。最后请求的路径:alias指定的静态资源URL。
更改 host:在 C:\Windows\System32\drivers\etc 目录下的 host 文件中添加一条 DNS 记录:
127.0.0.1 www.helloworld.com
配置文件:
1 | |
proxy_pass 反向代理路径
proxy_pass配置代理路径时,直接替换整个代理路径,包括ip地址的端口等:
- 在匹配到location配置的URL路径后,转发请求到【proxy_pass】配置的URL。
假如要将8080端口上的请求转发至3000端口。
- 前端请求为
http://localhost:8080/get/test,暂且把/get/test称为请求部分。
proxy_pass路径后带斜杠 / 与不带的区别:
- 无斜杆:
http://localhost:3000,proxy_pass路径会替代原本的ip和端口等,并拼接整个请求部分/get/test(包括location地址在内的完整请求地址)。等于转发去http://localhost:3000/get/test。 - 有斜杆:
http://localhost:3000/,则location路径只用于匹配、不附加上去,只附加未匹配到的部分。如:- location用
/get则是http://localhost:3000/+({/get}/test),等于转发去http://localhost:3000//test,报错。 - location用
/get/则是http://localhost:3000/+({/get/}test)。也就是要都加斜杠。
- location用
1 | |
root 和 alias 代理路径
root与alias主要区别在于nginx如何解释location后面的uri,这会使两者分别以不同的方式将请求映射到服务器文件上。
root:是最上层目录的定义。处理结果是,root 路径 + location 路径(即html/home文件夹)找内容。alias:是一个目录别名的定义。使用alias路径替换location路径(匹配的部分)。处理结果是,alias 路径(即html文件夹)找内容。- alias后面必须要用“/”结束,否则会找不到文件。
1 | |
https 反向代理配置
使用 nginx 配置 https 需要知道几点:
- HTTPS 的固定端口号是 443,不同于 HTTP 的 80 端口;
- SSL 标准需要引入安全证书,所以在 nginx.conf 中需要指定证书和对应的 key;
1 | |
负载均衡配置
Nginx 支持以下负载均衡算法:
- 轮询:请求轮流发送给应用服务器;
- 最少连接(权重):请求被分配给具有最少数量活动连接的服务器;
- ip 哈希:使用哈希函数确定请求应该选择哪一个服务器(基于客户端的 IP 地址);
在(网站域名指向的)公网 IP 所在的服务器上部署 nginx,对所有请求做负载均衡处理。
1 | |
解决跨域问题
见计算机网络文档中。
跨域问题:
- 如果在一台服务器上同时启动多个 webapp 应用,不能都用 80 端口,需要分别绑定不同的端口号。
- 前后端分离模式下,前端和后端分别是独立的 web 应用程序,前后端在交互时势必存在跨域问题。
可以通过反向代理将端口转发到默认端口。
- Nginx 代理前端到根目录,代理
/api到后端服务器、并进行负载均衡; 实现不同端口间的转发:HTTP 默认的端口号是80,Tomcat 服务器默认配置端口是 8080,想直接访问网址而不加端口来访问 Tomcat 下部署的项目时,必须进行端口转发。(即要达到这样一个效果:直接访问www.baidu.com访问的是8080端口,而不是其80端口)
首先,在 enable-cors.conf 文件中设置 cors :
配置说明:
Access-Control-Allow-Origin:允许跨域的域名,*表示允许所有域名。Access-Control-Allow-Methods:允许的 HTTP 方法(如GET、POST等)。Access-Control-Allow-Headers:允许的请求头。Access-Control-Expose-Headers:允许客户端访问的响应头。Access-Control-Max-Age:预检请求的缓存时间(单位:秒)。OPTIONS请求:用于处理浏览器的预检请求(Preflight Request)。
1 | |
动静分离
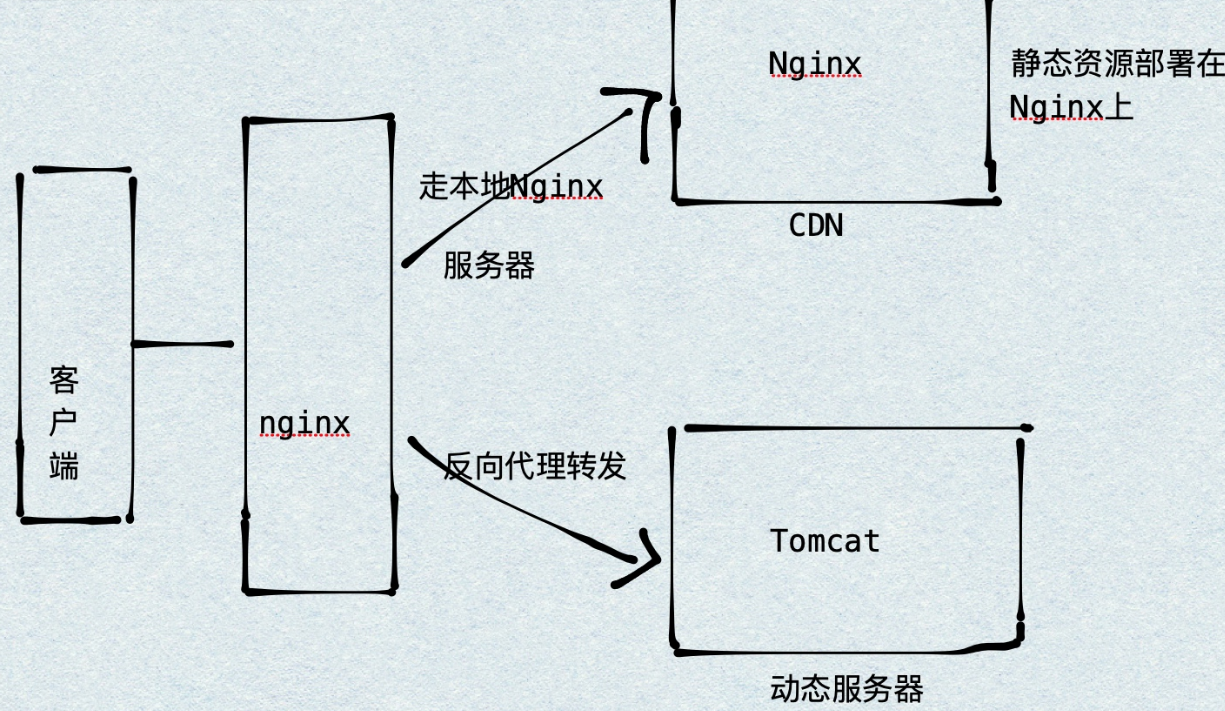
动静分离:简单来说就是把动态请求和静态请求分开、动态文件与静态文件的分离。
- 静态请求直接就可以通过 Nginx 处理,动态请求转发到后台交由 Tomcat 进行处理。
- 可以提高用户访问静态代码的速度,降低对后台应用访问,减轻服务器的压力。
静态站点配置
举例来说:如果所有的静态资源都放在了 /app/dist 目录下,只需要指定首页以及这个站点的 host 即可。
- 添加 HOST:
127.0.0.1 static.zp.cn
此时,在本地浏览器访问 static.zp.cn ,就可以访问静态站点了。
搭建文件服务器
1 | |